Submitted
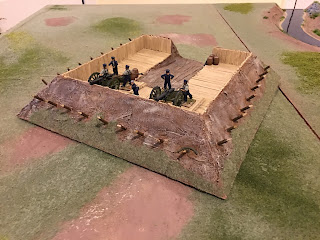
for your review is this humble redoubt and a handful of Napoleonic
figures for the Defensive Terrain bonus round. It's meant to represent a
fortified position from the 16th century up to the American Civil War.
This model is based on an artillery emplacement near Washington DC.
The first picture is a scene from the War of 1812 with a US regiment and
gun trying to hold back a concentrated assault of the Royal Marines and
the dreaded 95th rifles - desperate times indeed. I kept the figure
painting to a "minimum"to not detract from the fort itself
Of course I didn't paint any of the figures in the first picture for this year's Challenge - had you going there a few seconds!
For
the challenge, I did build the fort and painted up a Napoleonic French
Artillery battery in the 28mm scale. The figures are Perry metals and
I've had them in the lead pile for at least 5 years.
I'll
detail how the fort was constructed a bit later. It's overall
footprint is 1 foot square and is designed to hold either a three gun
artillery battery or an 8-10 stand infantry unit.
I've
left the details inside the fort (equipment and supplies) sparse for
two reasons - (i) to allow for better movement of troop stands and (ii)
allow the fort to be used for different time periods.
Some
of my artillery pieces are to low to peak out over the top so I built
some platforms to raise them a bit - think of them as artillery booster
seats.
The
positioning of the obstacles (technically referred to as "pointy
sticks") was done to both look good and facilitate holding troops stands
in place during those critical assault moments. Sharp angles and
troops stands often don't mix well.
Unlike a lot of
gamers, I find terrain making to be one of the most enjoyable aspects of
the hobby and am really grateful for Curt including some in this year's
Challenge.
The fort started out as 1" thick extruded "pink" foam. I used a proxxon hot wire cutter
for the job and really recommend you get one if you build a lot of
terrain with foam. I cut one 12 inch x 12 inch piece and 3 1x1 inch by
12 inch long sections for the upper level - one was an extra in case I
screwed up and I needed it.
I
then cut a 45 degree angle along the sides of all the pieces and dry
fitted the pieces in place. The access ramp was also cut out and then
angled by hand and there you go - the basic structure of the fort is
done and awaiting pinning and glueing.
The
next step involved a lot of cut match sticks to make the platform and
sides and when I say "a lot", I mean A LOT. Kind of tedious but I think
it looks good and also really helps with stability.
Once
the platform had set, the next step is to add "dirt". The ground cover
is a mix of tile grout (2/3) and white glue (1/3) which when dries
becomes really durable. I use a standard pre-mix "flexible" tile grout.
The flexible part is important - if the covering is too rigid you'll
get chipping. Once try, I can hit the piece with a hammer and not get
any noticeable damage. Make a few pieces of terrain you learn real
quick that durability is an extremely important design feature.
Paint
and add ground flock to taste. Given the size of the project, I use
craft paints and my ground flock mix to match my existing terrain board.
The "pointy sticks" are wooden kabob skewers that are sharped on both
ends and push/glued into the foam. Several orders of lamb an chicken
kabobs had to be consumed to finish this project - that's the type of
sacrifice I am willing to make for you, dear reader.
Honestly,
I had so much fun making this I'll probably build a few more after the
Challenge. Hmmm Curt perhaps we can consider a mini two week terrain
challenge during the summer???????
Just to be clear, scoring wise there is just the fort, 6 28mm artillery crewman and 2 guns.


This took some serious skill to build and it turned out brilliantly. All those matchsticks-holy cow! You must have the patience of a Saint.
ReplyDeleteBeautiful work Miles!
Great piece
ReplyDeleteNice piece Miles. I'm envious of your foam cutter sir!
ReplyDeleteI like how figure-friendly this is. Good work!
ReplyDeleteAnother great scratch built fort
ReplyDeleteIan
Good work Miles!
ReplyDeleteWell done Miles.
ReplyDeleteGreat work!
ReplyDeleteHoly construction contractor Batman!
ReplyDeleteYou've been very busy Miles and the effort was most definitely worthwhile. excellent redoubt :)
Well done Miles!
ReplyDeleteChristopher
That that is rather splendid. Very envious of your hot wire cutter too.
ReplyDeleteGrand bit of terrain! Nice thought put in to it also, it'd be a shame for that lot to tumble! ;)
ReplyDeleteThat is a stonking fort Miles! I know the match-stick flooring was a pain but it really adds to the overall effect of the piece. I was captivated by the last build shots and neglected to really look at the opening images until later. It looks quite splendid being assaulted by redcoats. Magnificent stuff!
ReplyDeleteI'm not surprised you entered this round Miles and what a fine entry it is.
ReplyDeleteBrilliant work Miles. It does look very formidible!!
ReplyDeleteExcellent work, Miles! Really super build! I love the way that you left the rear of the redoubt open! Cunning indeed, Sir!
ReplyDeleteMakes scampering away from a superior foe much easier
Delete